Friday, 1 September 2017

6 ways to lock down your iPhone’s lock screen


From text message alerts to wireless settings, your iPhone’s lock screen is brimming with sensitive data and controls. Here’s how to lock it all down.

Just because your iPhone is locked with a passcode or Touch ID doesn’t mean it’s safe from prying eyes and fingers. From text message notifications to Siri, your phone’s lock screen is brimming with alerts, features, and settings that anyone can tamper with, even after you’ve locked your handset.

Luckily, iOS has plenty of settings that can help lock down your phone’s lock screen. For example, you can keep sensitive notifications hidden, disable controls that could put your lost phone in airplane mode, turn off lock-screen access to Siri, and more.

Turn off lock screen notifications


You’d probably never dream of letting a stranger rifle through your text messages and email inbox, but that’s what could happen if you allow apps like Messages and Mail to put alerts on your iPhone’s lock screen. It’s even possible to reply to a text message or trash a mail message directly from the notification, even if your iPhone is locked.

If you’re worried about the wrong people seeing notifications from Messages, Mail, and other applications on your iPhone’s lock screen, consider turning off lock screen notifications for your most sensitive apps.

Tap Settings > Notifications to see a (probably massive) list of app the apps installed on your iOS device. Tap an app, then switch off the Show on Lock Screen setting to keep the app’s notifications from appearing on your lock screen. Unfortunately, there’s no way to turn off all lock screen notifications at once.

Block access to Today widgets and Notifications

Swipe from left to right on your locked iPhone screen, and you—or anyone else who’s got your device—can see your Today widgets. That means, depending on the widgets you’ve installed, they could check your calendar, peek at your Mail inbox, speed dial your favorite contacts, and more. Some apps are sensitive about what they show when your iPhone is locked—Activity, for example, and Find My Friends, won't show anything in their widgets until you unlock the phone.

Also, if you swipe down from the top of the Today view, you’ll see a running tally of all your lock screen notifications, neatly organized by date. Essentially, it’s a history of your important app activity for the past week, all there for anyone to see.

If you don’t want just anyone to be able to view your agenda in the Today view or past app alerts in Notifications, you can tap Settings > Touch ID & Passcode, scroll down to the Allow Access When Locked section, then uncheck the Today View and Notifications View settings.

Keep in mind that even with the Notifications View setting unchecked in the Allow Access When Locked section, individual lock-screen notifications for your apps will still appear on the lock screen, unless you disable them in the Notifications settings screen. You just won't be able to pull down the list of all your notifications.

Turn off access to Control Center

Flick up from the bottom of your iPhone’s lock screen and you’ll reveal Control Center, a panel of settings and controls that do everything from toggling your airplane and Do Not Disturb modes to setting timers and turning your iPhone’s LED flash into a flashlight.

It's handy, but leaving Control Center enabled on your lock screen could allow an iPhone thief to put your stolen device into airplane mode, rendering your lost handset untraceable via Find My iPhone. If you don’t want anyone messing with Control Center settings on your locked iPhone, tap Settings > Control Center, then turn off the Access on Lock Screen setting.

Block access to Siri

Siri can perform a surprising number of duties even when your iPhone is locked. For example, she can rattle off your agenda, schedule new meetings, create reminders, and even send text messages to contacts.

While Siri won’t perform sensitive tasks (such as reading your email) without a passcode, you can, if you wish, block access to Siri completely from the lock screen.

Tap Settings > Siri, then uncheck the Access When Locked setting.

Turn off Wallet access


If you’re an Apple Pay user, iOS will let you quickly access your stored credit cards from your iPhone lock screen by double-tapping the Home button.

While you can’t actually make a purchase without authenticating with Touch ID or a passcode, you may not want your Apple Pay cards so visible from the lock screen—or perhaps you’re just tired of your credit cards popping up whenever you double-press the Home button by accident.

To block lock screen access to your iOS Wallet, tap Settings > Wallet & Apple Pay, then uncheck the Double-Click Home Button setting. Your Wallet will still come up when you hover your phone over an Apple Pay terminal, or you can launch Wallet from its app or with Siri.

Put your missing iPhone in “lost mode”


Let’s say you never got around to securing your iPhone’s various lock screen features, and whoosh!—your iPhone vanishes from your pocket. If you act quickly, there’s still a way to remotely lock down your iPhone.

The trick is engaging Find My iPhone’s Lost Mode, which instantly silences all notifications, alarms, and rings from incoming phone calls. Control Center will also be disabled, and even the Camera shortcut—which can’t be turned off by any other means—will shut down.

To put your missing iPhone into Lost Mode, visit iCloud.com, click Find My iPhone, select your iPhone, then click the Lost Mode button. You can also turn on Lost Mode using the Find My iPhone app on another of your iOS devices.

Note that Lost Mode will only work if your missing iPhone still has wireless access. If the thief who snatched your handset puts it into airplane mode, you’ll be out of luck.
6 great Android features missing from iOS 11


Sure, iOS 11 looks cool, but Android's still cooler in some key ways.

Call me a flip-flopper, but the new features in iOS 11 have me thinking of jumping back to iOS after switching to Android barely a year ago.

Indeed, the new version of iOS brings such enticing features as a revamped App Store, a customizable Control Center, and drag-and-drop for iPad users, plus such catch-up features as one-handed typing and easy person-to-person payments.

But returning to iOS would mean leaving behind many Android features I've grown to love, from the ability to set up multiple user profiles to one-touch Google searches on whatever's onscreen at a given moment.

Read on for six awesome Android features that iOS 11 has yet to match, starting with...

Multiple user profiles

Given all the innovations coming to the iPad courtesy of iOS 11, from the ability to drag-and-drop elements from one side of the split screen to the other and the new, persistent app dock, you'd think Apple would toss in a feature that's been standard on Android for years: user profiles, perfect for letting family members in a one-iPad household create their own personal iPad spaces.

For whatever reason, though (privacy concerns, perhaps?), Apple has yet again passed on adding user profiles to the iPhone or iPad. That means if you share your iPad with your toddler or teenager, you're sharing all your iPad data, too, including your e-mail, your open browser tabs, your Facebook app, everything.

Multiple Do Not Disturb schedules

Android has really spoiled me with its "automatic rules" for Do Not Disturb mode. With automatic rules, you can set up multiple Do Not Disturb schedules for weeknights, weekends, meetings, and any other scenarios you dream up. For example, I have Do Not Disturb set to turn itself off early (as in 6 a.m.) on weekday mornings, while on weekends, Do Not Disturb keeps things quiet until about 8.

In iOS 11, though, Do Not Disturb mode still lets you set only a single schedule, meaning you can't set Do Not Disturb to give you more quiet time on weekends or during meetings.

Yes, the new "Do Not Disturb While Driving" feature (which automatically silences notifications whenever your iPhone senses you're driving) is a nice innovation, but it's too bad iOS 11 didn't catch up to Android's Do Not Disturb features.

Search the entire screen

As with previous versions of Apple's mobile software, iOS 11 lets you perform quick web searches on selected text via Spotlight, iOS's universal search feature. That's helpful if you want a deep search on a narrow selection of text, but sometimes I'm looking for a broader search of everything on my screen.

Here's where Android's Screen Search feature comes in handy. With a single tap of the What's on my screen button in Google Assistant, Android will scan the entire screen and return any relevant search results, handy if you want a quick, 360-degree cheat sheet on a news article or web page. Pretty neat, and there's no real equivalent on iOS, not even once iOS 11 arrives.

Clear all app windows

Here's an Android feature I'd sorely miss even though I know it's more cosmetic than anything else. The "Clear All" button on Android's Overview screen instantly closes all your open app windows, leaving you with a soothing "No recent items" message when you tap the Overview button again. For a neat-freak like me, tapping the Clear All button never gets old.

On iOS, though—and yes, this includes iOS 11—there's no easy way to clear out the massive stack of app windows on the multitasking screen, forcing you to flick up on dozens of individual windows until the coast is clear.

Now, I'm sure iOS comes with marvelous under-the-hood tools that manage the resources used by your apps and automatically suspends those that have been sitting untouched in the background for too long.

Still, though, I know it'll kill me the first time my thumb reaches for the non-existent Clear All button on my new iPhone 8 (assuming I actually make the big leap).

Delete all local photos & videos from the Photos app


You've probably heard about the new storage-saving features in iOS 11, particularly when it comes to the storage-hogging Photos app.

For example, Apple announced support for a new image format (HEIF, for "High Efficiency Image Format") that can halve the amount of storage gobbled up by your snapshots.

Also coming in iOS 11: shortcuts that do a better job of recommending storage-saving features like iCloud Photo Library, which uploads all your pictures and videos to the cloud and then automatically pares down the number of images sitting on your iPhone or iPad.

Those are worthwhile improvements, but here's something I'd sorely miss if I went back to iOS: the "free up space" feature in Android's Photos app, which instantly zaps each and every local snapshot and video stored on your handset.

Thanks to the "free up space" feature, photos take up less than 100MB of space on my 16GB Nexus 5X. On the other hand, the Photos app on my old iPhone 6 consumes a ridiculous 17GB of storage, even with iCloud Photo Library turned on (and yes, with the Optimize iPhone Storage option enabled).

Bonus tip: The iOS version of Google Photos has a "free up space" feature just like its Android counterpart, meaning you could clear up tons of storage space on your iPhone or iPad by uploading your photos to Google and then using the "free up space" option to delete your local copies. Keep in mind, though, that if you're using Google Photos and iCloud Photo Library at the same time, wiping your local images and videos with Google Photo's "free up space" feature will also delete those photos from iCloud, so make sure all your local image files are safely backed up first.

Symbol shortcuts on iPhone letter keys

As with the latest version of Google Keyboard for Android, iOS 11 will bring symbol shortcuts to letter keys on the iPad keyboard, handy for saving a few keystrokes when you need to type a number key, an ampersand, or another common symbol.

That's a welcome change, but unfortunately, iOS 11's so-called "QuickType" keyboard is only coming to iPad, not iPhone. Now, you could argue that the iPhone keypad is too small for symbol shortcuts, but the shortcuts on Google Keyboard work just fine on my five-inch Nexus 5X.

VGP-AC16V10 VGP-AC16V14 VGP-AC16V8 Sony VAIO TT TZ S1S2S3 series Change Power Supply fast shipping

How Intel Core chips could take over two-factor authentication from your phone


Just make sure that your first line of defense—a Windows password or PIN—is secure, too.

Password manager Dashlane is one of the first consumer-facing companies to take advantage of a little-known feature within Intel’s 8th-generation Core chips that could become much more popular: enabling two-factor authentication with just your PC, and not your phone.

What’s known as Universal Second Factor (U2F) authentication lives within the 8th-generation Core architecture. Typically, two-factor authentication (2FA)—recommended for years as an additional security measure for email, online storage, and other data—requires that a code be sent to your phone either via an app or SMS. Intel’s 8th-gen Core architecture and its associated software cut out the need for a phone, simply requiring you to click a software “button” to authenticate the 2FA transaction.

Technically, U2F support isn’t new. Intel’s 7th-generation Core chips, known as Kaby Lake, were introduced with a technology known as Software Guard Extensions, or SGX. SGX is essentially a protected area within the chip for storing encryption keys. But only two services announced support for SGX: Dropbox and Duo Security, which announced proofs-of-concept earlier this year.

Once the 8th-generation Core chips ship, Dashlane will immediately be able to take advantage of the built-in technology and use U2F as an additional form of authentication, Allison Baker, the strategic partnerships manager for Dashlane, said. She confirmed that U2F will work with 8th-gen Core chips for consumers, and don’t require Intel’s vPro technology for businesses.

“You don’t need a phone or anything else,” besides a compatible Intel-based PC, Baker said.

Why this matters: Breaking into your PC is bad enough—that’s why there’s Windows Hello, user PINs, and Windows passwords. With web services accessible from just about anywhere, however, there’s a need for a second layer of security to differentiate you from the bad guys. Two-factor authentication helps secure those online transactions; U2F promises to make them less of a hassle.

How U2F works within Intel’s Core chips
The FIDO Alliance developed U2F as an open authentication standard, designed to help simplify two-factor authentication. For the purposes of registering with an online service like Dashlane, two “keys” are created: a public one, which is registered with the service itself, as well as a private one, which is stored within the Core chip on the client PC.

According to Dashlane’s Baker, the client’s private key signs an assertion that the service can verify as coming from the client PC. But the signature is only released after the user verifies his presence by clicking a button on the screen, displayed by Intel’s Online Connect middleware. Intel’s been busy working on PC security solutions for years; last year, Intel showed off its Authenticate technology, combining fingerprints, PIN, paired phones, and more.

According to a GIF Dashlane prepared to demonstrate the process, authenticating with Dashlane requires entering your password. Intel’s Online Connect will then find the security key. Sending it on its way requires clicking on a button that appears randomly within a separate window, within 15 seconds. That window uses what’s called Intel Protected Transaction Display technology, which actually generates the screen from within the Intel chip itself. The user sees the button; according to Intel, any man-in-the-middle attacker would merely see a blank, black box with no indication on where to click.

It appears, though, that U2F places more of an emphasis on the first line of security used to defend your PC: Windows Hello, a PIN, or a password. If an attacker were able to guess your PIN while you left your eighth-generation PC alone to buy a cup of coffee, they’d still need to know your Dashlane master password to log in. But with traditional two-factor, phone-based authentication, a service like Dashlane would also buzz your phone—which you might have in your pocket, alerting you that an attack was in progress.

In any event, though, services like Dashlane appear to be preparing to take advantage of the U2F capabilities built into Intel’s Core chips. Passwords used to be sufficient, but complex, hard-to-guess passwords can be a pain to use repeatedly. The challenge is to offer security without imposing too much of a burden on the user, and Intel and its partners appear to be zeroing in on quick, convenient security methods.


Thursday, 31 August 2017

3 ways Windows 10 uses Android and iOS phones to make a better PC


Connecting your phone to your Windows 10 PC has never been easier—and with the hints Microsoft has dropped as part of the Fall Creators Update, it looks like the phone will be a big deal in future PCs.


Right now, if you own either an Android phone or an Apple iPhone, you can reply to texts right from your PC. In the future, you’ll be able to take webpages you were reading on your train ride and send them to your Windows PC at the office. Passwords? Who needs ‘em? And now, with a dedicated Phone section within the Settings menu, Microsoft appears to be setting up a framework for even stronger connections in the future.

For those of you frantically waving Windows phones—yes, you too can connect your phones to your PC, via the Continuum experience Microsoft debuted a little more than a year ago. Unfortunately, with limited hardware and tepid customer support, Microsoft’s Windows phone aspirations are basically dead. Instead, Microsoft has focused on bringing its ecosystem to the far more popular iPhone and Android platforms. There’s just one catch: You’ll need stable and Insider beta builds right now, at least until (hopefully) the Fall Creators Update unites the two.

1. Reply to texts right within Windows

If you’re like me, you probably work best without distraction—and most of your electronic gadgets are primarily designed to distract you, with notifications, popups and audible tones to get your attention. Texts and phone calls are the worst, in part because we’ve programmed ourselves to prioritize those needs above everything else. Now, Windows 10 allows you to treat a text like just another email.

Here’s what you’ll need: an up-to-date Windows 10 PC, an Android phone or iPhone—and, most importantly, the Microsoft Cortana app for Android or Cortana for the iPhone. If you wish, Cortana can step in and largely replace your phone’s digital assistant. Even if you refuse her assistance, however, Cortana operates behind the scenes as the connective tissue between your phone and your PC. We’ve used the most popular phone platform, Android, for this article.

The key to connecting your phone and your PC lies within the Cortana app’s cross-device settings (Go to the app’s “hamburger menu” in the upper left-hand corner, then go to Settings > Cross device.) Make sure that the top three settings (Missed call notifications, Incoming message notifications, and Low battery notifications) are all toggled on. You can also toggle on App notifications sync, though of the four apps Cortana detected, some were obsolete (my discontinued Basis Peak fitness band app) and others were of dubious value, such as Google’s VR services.

A bit strangely, the ability to sync Cortana itself is off by default. If you toggle it on, the app warns that Cortana will have the ability to read all your messages. For now, there doesn’t seem to be any reason to do so, though it’s certainly possible that in the future your spouse might be able to text you a reminder—“pick up eggs at the store” and Cortana will interpret it as a formal reminder.

As you might expect, the capabilities that the Cortana app toggled on enable the corresponding abilities within your PC. When your phone’s battery drops below a certain point (usually about 15 percent) a low-battery notification will slide in from the lower right-hand corner, and will archive itself within your Action Center notifications. If you miss a phone call, another notification will appear. Texts sent to your phone will also appear as pop-up notifications.

What makes this especially convenient is the ability to reply to phone calls and texts right at your PC. If you miss a text, for example, you can click the notification (look for the downward-pointing caret) and a text box opens up. Within it, you can send a reply, and Cortana will talk to your phone and send it on its way. Even if you miss a call, you can send a text letting the other party know you’ll respond soon. Windows doesn’t allow you to actually call the other party back—either by phone or by Skype—though this could, presumably, be added to the future.

If there’s a drawback, though, it’s that this capability still isn’t as reliable as it needs to be. If you move among multiple Windows PCs, Windows can get confused about which one you’re working on, and send notifications to another. But even if you’re not switching PCs, Windows has an annoying habit of not always sending notifications until you shift focus between apps, or resume working from sleep or hibernation. Then a string of notifications pop up on your PC. Fortunately, you can still go into the Action Center and respond via text from the notification itself.

2. Pick up where you left off, on the web

Microsoft is still adding features to the Windows 10 Fall Creators Update, and Windows 10 Insider Build 16257 finally added one of the features Microsoft had originally promised: the “pick up where you left off” capability for phones. The idea is that you should be able to move seamlessly between Windows devices, specifically your phone and your PC. Again, this should be eventually part of the Fall Creators Update, due in September or so.

To enable this feature, you’ll need to do two things: link your phone within Windows, and download the required mobile app.

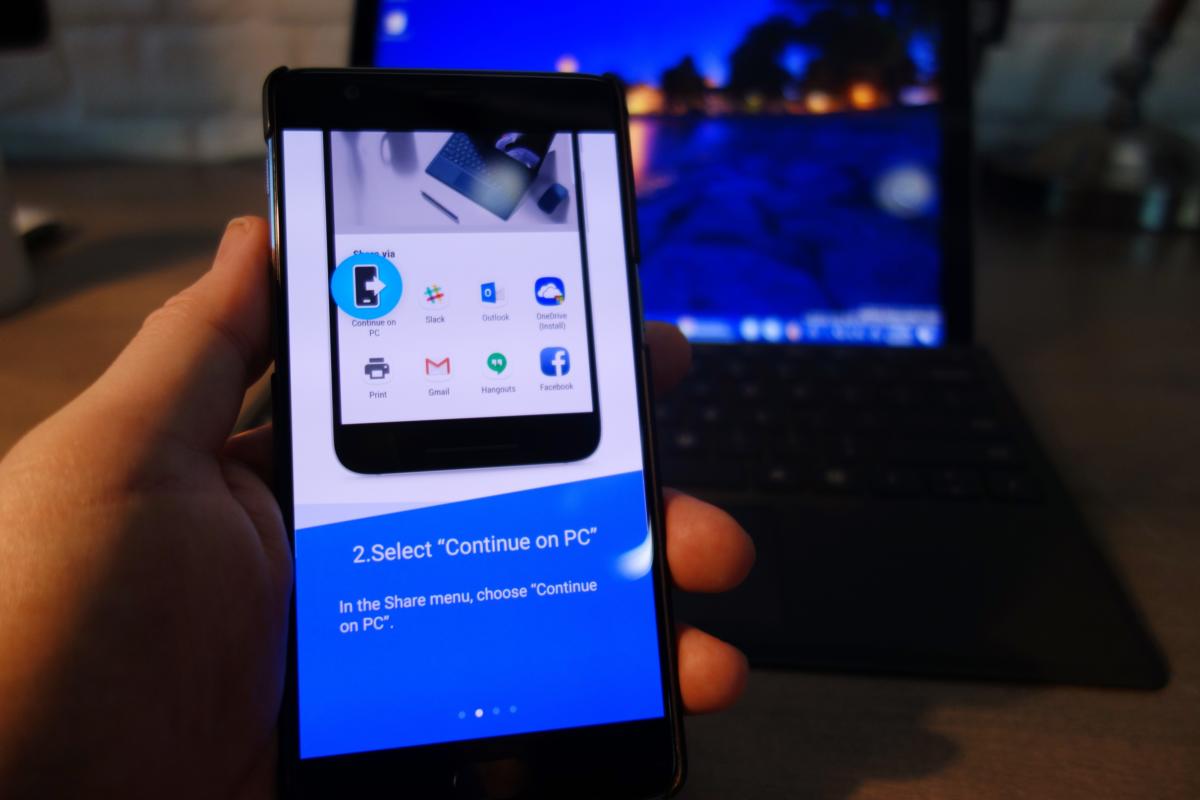
Insider Build 16257 adds a new section to the Settings menu: the Phone settings menu. There, the relatively spartan Phone settings asks you to connect your phone to your PC. To do so, you’ll need to enter your phone number to text yourself a link to the app you’ll need—Microsoft Apps, which began life as an index of the Microsoft apps within the respective app stores. A recent update enables the app to connect your phone to your PC. (It’s not clear whether you’ll eventually need both the Cortana apps as well as the Microsoft Apps to connect your phone to your PC, but for now, you do.)

Now, when you surf to a webpage—even on Android’s Chrome browser—you’ll have the option to “share” it to your PC, just as you might share it to Twitter or Facebook. You’ll have the options to share it now or share it later. Sharing it now immediately opens a webpage using Windows’ Edge browser. Sharing it later should place the link inside the Action Center’s notifications for later viewing, though a bug seemed to prevent that from working on my machine. (It appears that Build 16273 may fix this, based on the update notes.)

Right now, the sharing options are not available on the mobile Office apps, though you can always auto-save documents to OneDrive for later editing on the PC.

Note that Microsoft already provides a PC-centric “pick up where you left off” capability within Cortana, where users who work on more than one PC can theoretically resume their work on another PC. However, it’s of limited use. Click the Cortana search box, and then the “I’ve got more for you...” box just above. Cortana will then show you the apps you were previously working on. That’s of limited use: You’re really going to forget that you were working in Outlook?)

3. Bypass your Windows password and use your phone instead

By now, you’ve probably heard of two-factor authentication, where your phone is used as an additional authentication beyond your password. Use it! But you may not know that you can avoid using your Windows password and use your phone as the primary login method to certain Microsoft apps and services—theoretically, at least.

Remember, two-factor security is based on any two of these three factors: what you know, what you have, and what you are. Normally, two-factor authentication works by asking you for your password (what you know), then texting a code to your phone, or using an app (what you have). Microsoft’s Authenticator app for Android and iPhone is the approved way to receive that code. The combination of the password you know and the code Microsoft sends to your device secures the transaction.


Windows 10 Build 16241 gives the best sneak peek yet at the Fall Creators Update


As Windows 10's next big release date nears, the latest Insider Preview Build 16241 gives us a solid sneak peek at what the Fall Creators Update will look like. You'll see a some significant new features, including Ubuntu support, update delivery options, and improved Task Manager visibility. But tellingly, Microsoft also opened its final “bug bash” challenge. That means the Windows 10 team is just about ready to button up the OS for its promised September debut.

Build 16241 also shows it's serious because of the nature of its new features, emphasizing nuts-and-bolts improvements over new capabilities. For example, Windows 10 now offers a great deal more granularity into how Windows updates will be delivered, and how you can manage their bandwidth. Task Manager adds deeper insights into what’s going on with your GPU. Microsoft is also preparing for the launch of mixed-reality headsets with several updates to its MR capabilities.

Why this is important: Build 16241 marks the final lap in the race to the Fall Creators Update. Sure, it shows off some significant new features, but the simultaneous bug bash announcement signals that those will be the last additions. Remember, Microsoft has committed to a schedule of Windows upgrades in both March and September.That means the “shipping” version of the Fall Creators Update is just weeks away.

A greater degree of visibility within Windows

Massive Windows updates are part and parcel of owning a Windows machine. That doesn’t mean you have to like them, however. Part of the new Windows 10 Build 16241 includes what Microsoft calls Delivery Optimization Advanced Options, where you’ll be able to manage how much bandwidth Windows uses for updates. Typically, Windows tries to throttle itself so as not to not monopolize your connection. If you’re on a low-bandwidth pipe and watching Netflix, for example, the amount of Windows update data will slow to a crawl.

What Windows doesn’t know, however, is how much bandwidth is being used across your network, not only by other phones and PCs downloading information from the Internet, but also how much data is being sent from device to device. Now, you can manage that data.

That’s important for two reasons: The first is just the impact on your own network performance. But for those who live in rural areas or have signed up for a broadband plan with a strict data cap, managing that flow of information can be vital. Remember that your PC can also be used as a local “node” to send updates around the neighborhood, though you can turn that off.

To show how much data Windows actually requires, Build 16241 includes the new Activity Monitor, which tracks data to and from your network, specific to Windows and its updates.

If this level of visibility appeals to you, you’ll probably be happy to learn that Microsoft tweaked the GPU portion of Task Manager once again. Now, you can view the active GPU’s name and see which of its functions (including 3D, video decoding and video processing) are currently active. Microsoft also applied more descriptive labels to the tab processes used by Microsoft Edge, allowing you to see whether a particular Web page is slowing your system down, or a more generic service.

Prepping for mixed reality


Microsoft includes support for some fun in the latest build, too. Linux fans should be happy to know that the Bash shell now supports Ubuntu—an app that can be downloaded from the Windows Store.

Microsoft has also begun hammering out bugs within its mixed-reality devices—which have yet to begin shipping. It’s unclear whether headsets like Acer’s mixed-reality devices, which were shown off at the Build conference in May, will be ready in time for the Fall Creators Update launch, but Microsoft is apparently working hard to support them. The latest build includes support for USB motion controllers (with wireless support pledged soon) as well as a host of other improvements, including speech commands and a better teleportation experience. (In MR, users “jump” from spot to spot using what Microsoft calls “teleportation.”

We expected Microsoft to take a somewhat conservative approach to the Windows 10 Fall Creators Update, and so far it seems to be paying off. Assuming that the bug bash goes smoothly, that gives Microsoft about five weeks before September begins, and some wiggle room within that to ship the “final” version of the Fall Creators Update. Look for more of the pieces to fall into place over the coming weeks.

10 basic iOS tricks every iPhone owner should know


From message stickers and 3D Touch to Live Photos and Apple Pay, iOS is stuffed with attention-getting features that grab headlines and demand rounds of applause at Apple keynotes. But some of iOS’s most useful features are, in fact, the oldest ones. They’re easily overlooked, particularly by new iPhone and iPad users.

Read on for 10 basic iOS features that every iPhone owner should know, like how to take a screenshot, the ability to long-press your way to draft Mail messages, a physical button that doubles as the Camera app’s shutter release, and more.

Take a screenshot

One of the oldest iOS features around also happens to be one of the most powerful: the ability to quickly snap a photo of whatever’s on your iPhone’s (or iPad’s) screen. It’s handy for everything from documenting buggy iOS apps to quickly sharing a text message thread with a friend.

To take a screenshot, just press the Sleep/Wake and Home buttons at the same time; when you do, the screen will flash and you’ll hear a telltale camera snap. You’ll find your screenshot sitting in the iOS Photos app’s Screenshots album or in your Camera Roll. From there, you can share it by tapping the Action button (the square button with the upward arrow).

Unfreeze a frozen iPhone

Every once in awhile, your iPhone may come to a grinding halt, perhaps because of an errant app, or maybe iOS itself has wandered into a corner that it can’t get itself out of.

Generally speaking, quitting a frozen app (by double-clicking the Home button, then swiping up on the app’s multitasking card) is enough to fix the problem. You could also try a standard restart (press and hold the Sleep/Wake button until the “slide to power off” slider appears).

But if an app remains stubbornly stuck—or, worse still, if iOS becomes completely locked up—there’s another way to get things moving again: by force restarting your iPhone (a.k.a., a “hard” reset).

On pre-iPhone 7 models: Press the Sleep/Wake and Home buttons—but instead of letting them go immediately as you would when taking a screenshot, keep holding them until the screen goes blank. In a moment or so, you should see the Apple logo, a sure sign that your iPhone (or iPad) is rebooting itself.

On iPhone 7 or iPhone 7 Plus: Press and hold the Sleep/Wake and volume-down buttons until you see the Apple logo.

Take a picture with volume buttons

Keeping your iPhone steady while snapping a photo can be tricky when you’re trying to tap the shutter-release button on the slippery touchscreen.

If you miss the feeling of a physical shutter release, here’s a tip: pressing either of your iPhone’s volume buttons will also take a picture, handy for snapping photos while holding your iPhone firmly in both hands.

Silence the incoming call ringer

Whenever you duck an incoming call by tapping the Decline button or double-clicking the Sleep/Wake button, you send the caller straight to voicemail. That might be fine if you’re declining an unknown or spam caller, but you might want to think twice before sending your touchy boss directly to voicemail purgatory.

Instead, try clicking the Sleep/Wake button once instead of twice. Doing so will silence the ringer without sending the caller straight to voicemail. After a few rings, they’ll roll naturally to voicemail, just as if you were simply unavailable to take the call rather than declining the call outright.

Type in all-caps

Nope, there’s not a separate Caps Lock button on the stock iOS keypad, but there’s still an easy way to type in all-caps mode: just double-tap the Shift key.

When you do, the Shift button will turn bold, and you’ll see a little underline just beneath the arrow. To go back to standard typing mode, double-tap the Shift key again.

Type characters with accent marks


Just because you don’t see any accent marks in the stock iOS keyboard doesn’t mean they’re not there.

To type, for example, “voilà” instead of “voila,” tap and hold the “a” key. When you do, a pop-up with a series of accents will appear, everything from acute and grave to circumflex and umlaut. Slide your fingertip to the accent mark you want to type, then release.

Shake to undo


When you’re tapping out a message but have a sudden change of heart about how to phrase your thought, there’s an easier way to start over besides tapping the Backspace button over and over.

Instead, just shake your iPhone; when you do, an Undo Typing pop-up will appear. Tap the Undo button to undo what you just typed. To redo the typing you just undid, shake your iPhone again.

Jump directly to your draft Mail messages


If you tap Cancel while composing a new Mail message, you’ll get the option to save the unfinished message as a draft. All well and good, but retrieving a saved draft message the regular way—that is, by tapping the Mailboxes button and navigating to the Drafts directory—can be a royal pain, particularly if you’re using multiple email accounts on the iOS Mail app.

Luckily, there’s a handy but hidden shortcut that will take you to all your Draft messages, regardless of which account you created them in: just tap and hold the Compose button. To continue a draft message, tap to open it, or swipe to delete it.

Create an event directly from a Mail message


If you receive, say, an invitation to lunch via email, there’s no need to memorize the date and time and plug them into a new Calendar event.

One of Mail’s handiest features is its ability to detect dates and times within a message. Mail will underline the date within the body of the message, and it will also put an “Event found” banner at the top of the screen.

Tap the underlined date (or just tap the “Event found banner”), then tap Create Event. When you do, a new calendar event will slide into view, with the date and time already filled in. Just fill in any additional details, then tap Add.

Put a website shortcut on your home screen

If there’s a site that you’re constantly visiting on your iPhone, you can create an icon for the site and pin it to your home screen. Once you’ve created the icon, it will act just like a standard app icon, meaning you can tap and hold it to rearrange it on your home screen, tuck it into an app folder, or even put it into the app dock.

Just visit a site in Safari for iOS, tap the Action button (the square one with the upward arrow), then tap Add to Home Screen. You’ll have a chance to rename the icon before you pin it to the home screen.


Wednesday, 30 August 2017

Asus ZenBook laptops power up with quad-core CPUs and discrete Nvidia graphics

Bigger power comes to Asus' slim, light laptops.

The battle over thin and light notebooks flared back to life at IFA 2017 on Wednesday. Mere hours after Acer revealed the Switch 7 Black Edition, a 2-in-1 laptop with a detachable keyboard and dedicated graphics chips, Asus unleashed an army of svelte new ZenBook laptops equipped with Intel’s new quad-core 8th-gen Core CPUs and discrete Nvidia GPUs of their own. We loved the last ZenBook Flip that crossed PCWorld’s test bench, so let’s dig in!

Asus beat the drum loudest for the ZenBook Flip 14, which it calls “the world’s thinnest 2-in-1 laptop with high-performance discrete graphics.” The 13.9mm-thin laptop packs the same somewhat mysterious GeForce MX150 chip as Acer’s Switch 7 to achieve that feat. Nvidia says the MX150 is three times more efficient and 30 percent faster than the GeForce 940MX it replaced. The laptop’s no slouch in other areas either, with a quad-core Core i7 processor, 16GB of RAM, and a 512GB PCIe SSD.

The ZenBook Flip 14 includes niceties beyond swanky graphics and a small size, though. Audio duties are handled by Harman Kardon, and the notebook packs a fingerprint sensor for Windows Hello biometric authentication. A “NanoEdge” bezel let Asus include a 14-inch 1080p panel while giving the laptop a similar footprint to most 13-inch notebooks—and that display can flip a full 360 degrees.


The ZenBook Flip 15 is a bit larger and swaps out Nvidia’s MX150 chip for gamer-friendly GTX 1050 graphics. Asus puts the extra space to good use, offering your choice of 1080p and 4K displays with a 178-degree field of view, Thunderbolt 3-equipped USB-C ports, and up to a 2TB hard drive in addition to everything you find in the Flip 14.

Asus says the Flip 15 is the most powerful ZenBook Flip ever. If you want to push your gaming experience even further, the company also announced the ROG Station X2. This second-generation Asus graphics card dock lets you power up your laptop with full-blown desktop graphics cards. It connects over Thunderbolt 3.

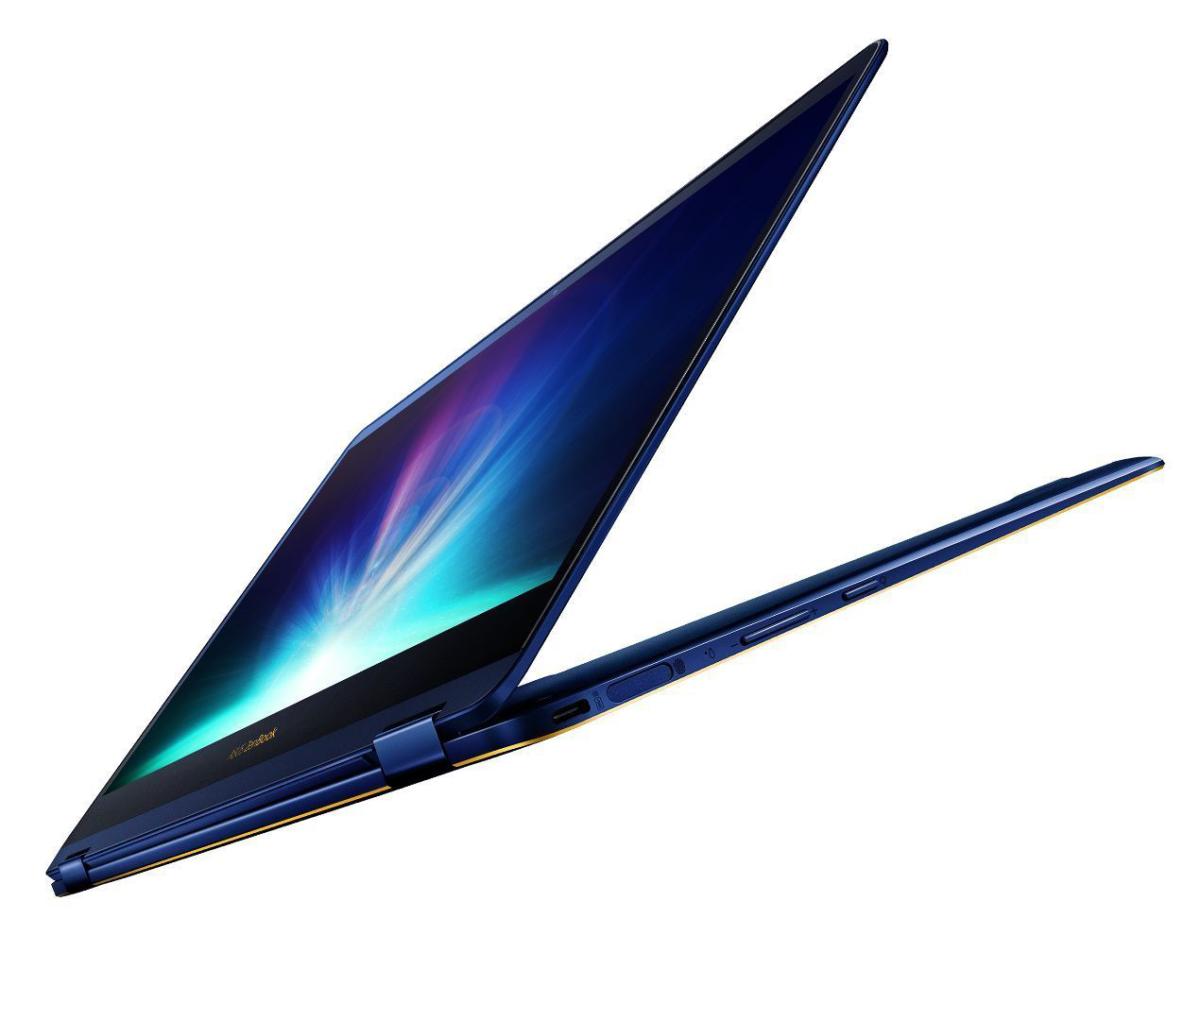
The ZenBook Flip S is even smaller than the itty-bitty Flip 14, measuring in at just 10.9mm thick with a 2.42-pound heft. Despite that tiny size the 2-in-1 harbors an 8th-gen Core i7-8550U processor, a 1TB PCIe SSD, and a fingerprint reader, as well as an option to upgrade to a 4K display.

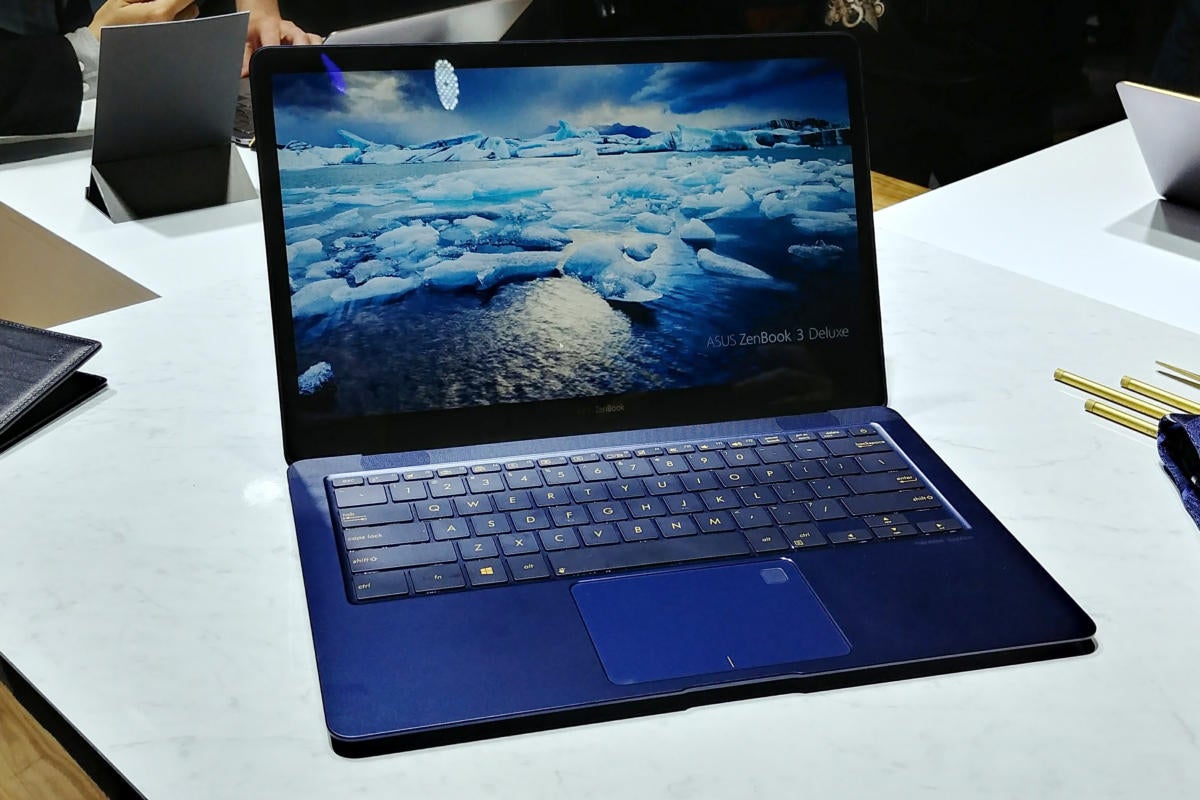
The 14-inch ZenBook 3 Deluxe and 13-inch ZenBook 13 lack the rotatable displays of the Flip models but offer similar upgraded amenities, including thin-and-light designs, 8th-gen Intel Core processors, PCIe SSDs, Thunderbolt 3 ports, and tiny NanoEdge bezels. The ZenBook 13 also includes Nvidia’s GeForce MX150 discrete graphics. The company’s slightly thicker, but more affordable VivoBook laptops received the 8th-gen CPU treatment, too.

Availability and U.S. pricing for the ZenBook laptops weren’t announced. On the opposite end of the notebook spectrum, Asus’ ROG gaming brand revealed the ROG Chimera, a hefty gaming rig that brings buttery-smooth 144Hz G-Sync displays to laptops.


Speed up Windows 10: Tips for a faster PC


Your Windows PC too slow? Here are nine speed tips to give your PC a performance boost without spending a dime.

Your computer is slow. Annoyingly slow. You can add RAM, or buy a faster SSD, but that costs money. No, the first thing you should do is try to make Windows faster. Thus we present nine ways to speed up your Windows 10 PC without spending a dime.

1. Give it the reboot

If your PC is behaving horribly slow, try rebooting. Yes, it’s an obvious solution, but people tend to forget the obvious.

The sleep or hibernate setting will save power, but only a full reboot clears out the cobwebs in Windows’ brain and gives it a fresh start. Do it every day if the PC is really slow.

2. Turn on High Performance


Windows assumes that you want an energy-efficient computer. But you can trade electricity for speed. Use this tip only if you’re willing to increase your electric bill and decrease your battery performance.

Right-click the Start button and in the resulting menu, select Power Options.

In the resulting Control Panel window, pull down the Show additional plans option. Select High performance.

3. Undo some appearance options

Windows works hard to make the screen easy on the eyes. If your PC is underpowered, you may want to sacrifice aesthetics and gain some speed.

Right-click Start, and select System. In the resulting Control Panel window’s left pane, select Advanced system settings.

This brings up the System Properties dialog box, already on the Advanced tab. Click the Settings button in the Performance box (the first of three “Settings” buttons on this tab).

This brings up another dialog box. You can uncheck some of the options, or simply select Adjust for best performance.

4. Remove unneeded autoloaders

A whole lot of programs want to load automatically every time you boot. Each one slows down the boot process, and some continue to slow down Windows afterwards.

These are not all bad. Your antivirus program should load when you boot and keep running as long as your PC is on. Other programs that need to run in the background to work, such as OneDrive, should also autoload.

But some programs—even good ones that you use frequently—don’t really need to run all the time. You don’t want to uninstall those, but you may want to stop them from autoloading.

To see how bad the situation is, right-click the taskbar and select Task Manager. Click the Startup tab. (If you don’t see any tabs at the top of the window, click More details in the lower-left corner.)

The Startup tab will show you all the autoloading programs. As you examine the list, think about what programs don’t really need to keep running at all times. To stop one from loading automatically, right-click its entry on the Startup tab and select Disable.

If you don’t recognize the name of an autoloader, right-click it and select Search online to help you find more information.

5. Stop hog processes


Your computer may be running a poorly written process that’s hogging a lot of resources. To find out, right-click the taskbar and select Task Manager. (Once again, if you don’t see any tabs at the top of the window, click More Details.)

On the Processes tab, click the CPU column header to sort by processor usage. The top items will be the ones hogging the CPU. (If the top processes are all using 0%, the processes are sorted in the wrong direction. Click the column header again.)

Don’t assume that the top process is necessarily a hog. Some big applications are worth the CPU cycles. One way to manage these programs is to close them when you’re done with them. Another is to switch to a smaller program.

If the hog is Windows Driver Foundation, see this Windows Club article.

You can close a process from inside Task Manager. Select the process and click the End task button and confirm your decision. But this should be avoided.

When you’re done, click the Memory column header and repeat.

6. Turn off search indexing

When you search for a word across all the files in your Documents library, the results come up almost immediately. That’s wonderful, but it comes at a price. When you’re not searching, the indexing needed to create those fast searches slows you down.

To turn off all indexing:

1. Open Windows Explorer, right-click your C: drive, and select Properties.

2. On the General tab, uncheck Allow files on this drive to have contents indexed in addition to file properties.

3. In the resulting warning box, select Apply changes to drive C:\, subfolders and files.

Windows may take some time turning off the indexing. Get up and take a walk; it’s good for you.

There’s another option that will let you turn off some indexing but not all of it:

Type indexing in the Cortana field. Select Indexing Options. Click the Modify button near the lower-left side of the resulting dialog box.

This brings up another dialog box, with two sections. And yes, it’s confusing. Start in the bottom section of the dialog box, Summary of selected locations. Click any of these options, and it changes the contents of the top section, Change selected locations.

7. Turn off Windows tips
Windows 10 occasionally gives you tips about how you can better use the operating system. The problem is that, in order to see what tips you need, it keeps an eye on how you’re using your PC.

Yes, that sounds worrying from a privacy issue, but it also slows down your PC.

To turn it off, click Start > Settings. Select System, then select Notifications & actions in the left pane.

At the bottom of the Notifications section, turn off Get tips, tricks, and suggestions as you use Windows.

You might also want to explore the other notification options, and turn some of them off, as well. I don’t think any of the others slow down the PC, but they can get annoying.

8. Clean your internal drive

If your internal storage is almost full—whether it’s a hard drive or an SSD—that could be slowing you down. But if your drive has plenty of free room, skip this section.

Start with Windows’ own Disk Cleanup tool. In the Cortana field, type disk and select Disk Cleanup.

Wait while Disk Cleanup examines your drive. Click the Clean up system files button (this time you’ll need an administrator password). Then wait again for another examination.

Examine the options. If you find one called Previous Windows installation(s), you’re in luck. By checking it and clicking OK, you’ll free up a lot of space. You can check other items to get rid of them, as well.

Something else you might want to consider: Uninstall programs you no longer use.

9. Check for Malware

I doubt an infection is intentionally slowing down your PC. There’s no illegal profits from that. Plus it's a sure-fire way to trigger a victim's suspicions.

But some malicious code could be slowing down your PC, even if that wasn’t the criminal’s intention. So if you’re suspicious, read Eric Geier and Josh Norem’s guide on how to remove malware from your Windows PC.

If after performing these tips, your PC still feels sluggish, it might be time to upgrade your hardware. Start here, with PCWorld's recommendations of killer, but shockingly cheap PC upgrades.

20Wh 7.4V New Battery Dell TM9HP For Dell Latitude 13 7350 Ultrabook

CrashPlan alternatives: What home users can do, from staying put to exploring other services

The easiest way out (if not the cheapest)? Just upgrade to Crashplan's business tier.

It's been a week since CrashPlan decided to call it quits on its personal backup service. But CrashPlan isn't going away—it's just ending a program that probably wasn't profitable. After the initial shock, home users should realize there’s absolutely no reason to panic—or even be hasty. The company will keep your data safe for an extra 60 days past the end of your current subscription, and it will keep its servers online until October 23, 2018. But it's still a good time to figure out your next move, so we'll walk you through the options.

CrashPlan option 1: Upgrade to a business plan


You needn't leave CrashPlan at all if you turn your home plan into a business plan. Just pony up the $10 a month for the small business plan and keep on keepin’ on. The company (Code42) is also offering a 75% discount to users for the first 12 months.

CrashPlan option 2: Free or cheap alternatives

If the business plan doesn't fit your budget, then what you need to do depends on how you used CrashPlan. If you simply maintained a backup of your current data with the service, you don't even need to download your backup from CrashPlan. Just start backing up elsewhere.

There are any number of free services for small data sets: 15GB Google Drive, 5GB iCloud, 5GB OneDrive, and 5GB Dropbox. You may also choose from low-cost tiers of pay services, including the one CrashPlan recommends—Carbonite. In fact, Carbonite is offering a 50% discount for CrashPlan users.

CrashPlan option 3: Download archives


If you used CrashPlan for archiving—that is, you stored data on the company’s servers without keeping a local copy—then you’ll need to download that to your local PC before your subscription ends (plus the 60-day extension). The CrashPlan servers might be a tad stressed right after the announcement, but wait a couple of weeks and you should be able to download without undue delay. If you procrastinate, you could always move to the $10-a-month business plan until you got your act together.

CrashPlan option 4: External backup


If CrashPlan was your only backup, now is a good time to consider backing up your backup—combining a cloud service with backup to an external drive. Check out our backup software reviews to find our recommendations.

Note: This article was edited to capitalize the "P" in CrashPlan at the request of the company, as well as to note the one-year 75% discount for exiting users when they change to the business plan.


Tuesday, 29 August 2017

8 cool Android Nougat features you’re probably not using


Google used to produce a rather bare-bones version of Android, counting on OEMs like Samsung and LG to add in all the other cool features people might want. But today’s stock Android is more powerful, more feature-rich, and more attractive without any help from the device makers.


In fact, Google has pushed OEMs to use even more of the basic Android experience without making unnecessary changes. This could mean some awesome features are lurking inside your phone that you don’t even know about. So here are eight cool features inside Nougat (Android 7.0) you’re probably not using.

Split-screen Chrome

Android 7.0’s split-screen app capabilities are well known, but there’s one app that includes a very cool and useful feature that isn’t so obvious: The Chrome browser lets you run two different tabs on the screen at once.

To run two webpages in split-screen, open Chrome and ensure you’ve got at least two tabs open. Long-press your Android overview button (it’s the one shaped like a square, right next to the home button) to launch split-screen mode as you normally would. Now tap the overflow menu button in Chrome, and select “Move to other window” (see screenshot above).

The tab you have up will move over to the other side of the split as a second instance of Chrome. When you’re done, exit split-screen mode by dragging the divider to one side. The tab will go back into your single Chrome instance. You can also close the tab and open a different app in split-screen mode.

Clear all apps in multitasking

Sometimes you just need to start fresh in your overview screen, or shoo away all those open apps. Not all Android devices offered a quick way to do that before, but as of Android 7.0, there’s a proper “clear all” option for the overview list on all devices.

Some OEMs like Samsung and LG make the Clear All button very accessible at the bottom of the screen—maybe even too accessible, as you can accidentally hit it and close all your open apps. On Google’s build of Android (and those based closely on it, like Motorola’s), you can find a Clear All option at the top of your stack of apps. Just scroll all the way up, and you can press the button to remove all apps. Importantly, this does not clear background tasks—it only ends user-facing activity.

Third-party quick settings

All phones and tablets running Android 7.0 include a customizable quick settings panel. However, there’s another aspect of this feature that might interest you. You can also use third-party quick settings tiles on any device. To find out if you have any, open the quick settings and tap the edit button (it looks like a pencil).

Below the main list of settings is a selection of unused tiles. Any apps you’ve installed that have their own quick settings tiles will show up here. You can long-press and drag to add or remove apps. You can get quick access to things like VPN connections (PIA), a Twitter client (Flamingo), and a variety of custom settings (Tile Extension for Nougat).

App install source

Google has gradually been beefing up the information available in your app settings interface. Nougat added a particularly cool new feature: You can now see where an app came from—Google Play or a sideloaded APK.

To find this bit of info, open your system settings and select “Apps.” Pick any app in the list and scroll down to the bottom of the info screen. It will say either “App installed from Package Installer,” or “App installed from Google Play Store.” For those apps installed via the Play Store, you can tap the embedded link to go right to the app’s listing in the Play Store. The package installer link for sideloaded apps won’t do anything, though.

Quick app switching

Google revamped the multitasking interface back in Lollipop, but Android 7.0 offers a new, faster way to flip between apps. If you need to get back to the last app you had open, you don’t have to tap on the card in the overview screen.

Just double-tap the overview button, and you’ll switch to the last app. Do it again, and you’ll return to the app you just left. This should work on all Android devices running Nougat or higher.

App shortcuts


Google’s new app shortcuts (previously known as launcher shortcuts) are one of the few new features that rolled out as part of Android 7.1 Nougat. That means phones and tablets on 7.0 won’t have them. But for those devices that do have app shortcuts, you now have faster access to useful menus and features right from your home screen. All it takes is a long-press on the app icon.

With the long-press menu up, you can tap on the list of shortcuts to open the app to the corresponding screen or action. For example, Google Drive has search, scan, and upload as app shortcut options. Settings has battery, data usage and Wi-Fi. The phone dialer will show you options for frequent contacts.

There’s another layer here: If you find yourself often going to the same place and doing the same thing in an app, you can make the long-press app shortcut into a regular home screen shortcut. Simply long-press on one of the shortcuts and drag it out of the pop-up menu. It becomes an icon that you can drop anyplace you want, and then launch it with a tap.

Pin apps to share menu

The Android share menu makes it easy to push links and files from one app to another. However, if you have a lot of apps installed, the list of apps and actions in the menu can get rather ungainly. There’s a little-known feature in Nougat that can help: If you’re frequently using the same few apps in the share menu, long-press on them in the menu. You get a popup that offers to link the app info settings or pin the app.

Pinned actions in the share menu always appear at the top of the list for easier access. But be aware, this works only in the native Android share menu. If an app implements its own version of the share activity, your pinned apps may not be visible at the top.

Data saver

Most of us have to live with capped mobile data plans, but Android 7.0 added a new feature that can help you stay under the cap. The aptly named Data Saver feature is available on virtually all Nougat phones under the Data Usage settings menu. Data Saver lowers your mobile data usage by preventing apps from using data in the background. Just turn it on, and apps will pull down bytes only when you’re actively using them.

All phones have at least a few apps and services that are exempted from the Data Saver restrictions. You can see which ones have unrestricted access in the Data Saver settings (they’re usually Google Play Services, notification handlers, and other system components). You can turn unrestricted access on or off for any app, but be aware you might break things.

There’s still a lot of neat stuff lurking inside Nougat. And with Android O just around the corner, just think of all the surprises to come.

4300mAh/32WH 7.4V New Battery Dell YN6W9 For 7.4V 32WH

43Wh 11.1V New Battery Dell D2VF9 For Dell Inspiron 15 7547

4400mah 11.1V New Battery ACER UM09A71 For Acer Aspire One ZA3 ZG8

45W Type-C Laptop AC Adapter for ASUS ZenBook 3 UX390 UX390U UX390UA

5000mAh/6Cell 11.1V New Battery Acer AL14A32 For Acer ASPIRE E5-521 ASPIRE E5-521G ASPIRE E5-531

How to test your home internet connection speed


Testing your internet connection’s performance is a straightforward exercise. You don’t need any extra software—all you need is a computer with a web browser. But there are also a few things you can do to make sure you are getting the most accurate reading of your internet connection. Here’s what to do.

Get ready

For best results, you want to use a wired connection if at all possible; that way, you don’t have to worry about interference and performance fluctuations that can occur while you’re on Wi-Fi. If you have any other wired devices on your home network, plug your test computer directly into the modem so those don’t interfere in your testing.

If you’re stuck using Wi-Fi—say, you have a MacBook Air or a tablet or some other device that doesn’t have an ethernet port—do what you can to minimize interference. Make sure your Wi-Fi router is away from other electronic devices like cordless phones, and temporarily disconnect any other devices from your Wi-Fi network—after all, you don’t want another computer on your network to download a gigabyte worth of software updates while you run your tests.

While you’re at it, double-check to make sure your computer isn’t downloading something in the background. Check the Task Manager on Windows (summoned by pressing control-alt-delete) or Activity Monitor on MacOS, and look for network statistics (it’s labelled “Network”on MacOS, “Networking” on Windows).

Close or quit all apps on your computer to keep apps from downloading software updates while you test your connection. Your bandwidth usage may not drop to zero and stay there, but you want it as close to zero as it’ll get. If your operating system is downloading updates, there isn’t much you can do aside from wait and test your connection later.

If you’re having any problems with your connection, now is a good idea to reset your modem and router. Switch them off and unplug them for a few moments, then plug them back in and switch them on.

Test your connection

Ookla’s Speedtest.net is the most common site to test your internet connection; all you need is a web browser with JavaScript turned on (it usually is unless you switched it off) and Adobe Flash installed. There are a couple of alternatives if you don’t have Flash installed (and don’t want it installed). There’s an HTML 5 version of Ookla’s Speedtest.net, or you can use Speedof.me, which also uses HTML 5.

All you have to do at this point is click the green “Begin Test” button, and Speedtest.net will check both your download and upload speed. This may take anywhere from a few seconds to a few minutes, depending on your network speed.

Those aren’t your only options for testing your broadband connection; MegaPath also offers a speed test, as well as what it calls Speed Test Plus, which evaluates the quality of your connection in addition to its raw speed. Your ISP might also offer a speed test tool, though you may need to do a little poking around for it. And router manufacturers are increasingly including speed tests in their products’ firmware and/or the mobile apps they distribute with their products (although in that latter case, you’ll be using a wireless connection).

Isolate the problem


Don’t be surprised if you’re not getting the top speed your ISP says it can deliver—almost no one does. But if your connection is significantly slower than what was promised, many different factors could be coming into play. There might be a problem with your equipment, or it could be an issue on your ISP’s end. Most ISPs maintain a tech-support page where you can go to see if they're aware of any problems with their service. This link will take you to the location of AT&T's DSL troubleshooter.

If your ISP isn't reporting a problem, you can start your own troubleshooting by eliminating your equipment as a factor. First try using a different computer. If you get acceptable performance on the second machine, you can't blame the ISP. If the second computer also has a slow internet connection, run another bandwidth test after each of these suggestions: Try using a different ethernet cable to connect your PC to your router. Try swapping out the cable that connects your router to your internet gateway (your DSL, fiber, or cable modem). Troubleshoot your router: Turn it off or unplug it for a minute or two and then turn it back on. You should always be running the latest firmware on your router, so this is a good time to update it if you haven't lately. If you're still not seeing an improvement, try power-cycling your DSL, cable, or fiber modem.

If you've jumped through all of those hoops, and you're still have performance issues, it's time to call your ISP's tech-support line.

4300mAh/32WH 7.4V New Battery Dell YN6W9 For 7.4V 32WH

43Wh 11.1V New Battery Dell D2VF9 For Dell Inspiron 15 7547

4400mah 11.1V New Battery ACER UM09A71 For Acer Aspire One ZA3 ZG8

45W Type-C Laptop AC Adapter for ASUS ZenBook 3 UX390 UX390U UX390UA

5000mAh/6Cell 11.1V New Battery Acer AL14A32 For Acer ASPIRE E5-521 ASPIRE E5-521G ASPIRE E5-531

The Asus ZenBook Flip S is the world's thinnest laptop


The Asus ZenBook Flip S is the thinnest convertible laptop in the world--at least for now. Announced Monday at Computex in Taipei, the ZenBook Flip S is the latest to snatch the trophy as vendors wage an eternal battle to shave down their portable PCs. The 10.9-millimeter profile of the ZenBook Flip S currently takes the record. The laptop will be available later this year at prices starting at $1,099. Read more about it below, and also two other slender notebooks Asus announced at its Monday event at Computex in Taipei.

Thin is always in


Asus was very specific in showing how thin the ZenBook Flip S is compared to the competition. Chairman Jonney Shih laid it out in his presentation:

HP Spectre x360: 13.8mm

MacBook Air: 17mm

MacBook: 13.1mm

ZenBook Flip S: 10.9mm

At just 2.4 pounds, the Zenbook Flip S is also lighter than the HP Spectre x360 and the MacBook Air, though not the 2-pound MacBook. Yet it packs the heavyweight punch of Intel’s Corei7-7500U processor and can accommodate up to a terabyte of PCIe SSD storage.

Like all convertibles, the screen can be folded all the way around and the laptop used in a tablet configuration. The touch display has a 4K resolution (3,840x2,160 pixels) and support for Windows Ink with an optional Asus Pen. Corning’s Gorilla Glass adds durability. When the screen unfolds past 135 degrees, the hinge props up the keyboard from the back to create a more comfortable angle for typing.

The computer's accessories include a tiny fingerprint sensor for one-touch login via Windows Hello in laptop or tablet mode. There are a couple of USB-C ports and support for fast charging. Asus says the battery will last for 11.5 hours and can be fast-charged to 60 percent of capacity—about 7 hours—in just 49 minutes.

Asus ZenBook 3 Deluxe

170529 zenbook 3 deluxe

Asus has upgraded its ZenBook 3 laptop with a new model that carries the “Deluxe” name. The UX490 is the thinnest 14-inch laptop on the market at 12.9 millimeters thick, according to Asus.

It weighs 2.4 pounds and is the first laptop to feature Corning’s Gorilla Glass 5, the latest version of the popular impact-resistant glass, Asus said. The company said it can support up to 9 hours of battery life and will be available at prices starting from $1,199.

Like the Flip S, the computer is based on a Core i7 processor and has up to 1TB of PCIe SSD storage. The twin USB-C ports support Thunderbolt 3, so dual 4K monitors could be hooked up, but the laptop itself offers just a Full HD (1,920x1,080 pixels) panel.

For gaming-level graphics performance, the laptop can be connected to the Asus ROG XG Station 2 external graphics dock, which can support cards as large and hot as the NVidia GTX 1080.

Asus ZenBook Pro


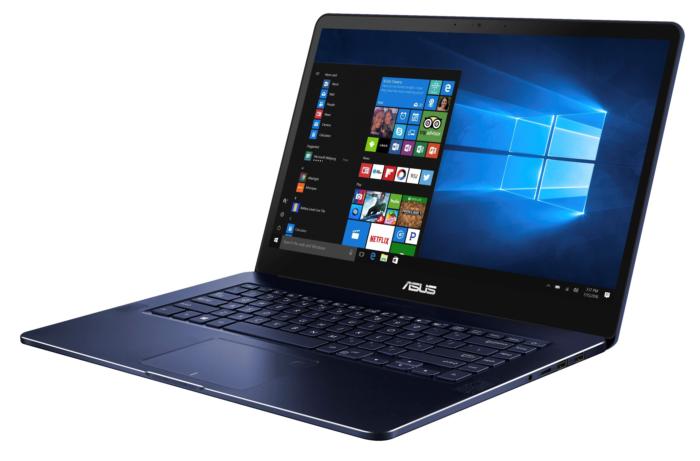
The third addition is the ZenBook Pro UX550. Starting at $1,299, it’s based around the Intel Core i7-7700HQ quad-core processor and an Nvidia GeForce GTX 1050Ti graphics card.

It’s both thinner and lighter than previous ZenBook Pro machines at 18.9 millimeters and just under 4 pounds. It has a spacious 15.6-inch 4K screen. Asus has found room for a four-speaker audio system, battery life is an impressive 14 hours according to Asus, and it comes with a fingerprint sensor for Windows Hello biometric login.

4300mAh/32WH 7.4V New Battery Dell YN6W9 For 7.4V 32WH

43Wh 11.1V New Battery Dell D2VF9 For Dell Inspiron 15 7547

4400mah 11.1V New Battery ACER UM09A71 For Acer Aspire One ZA3 ZG8

45W Type-C Laptop AC Adapter for ASUS ZenBook 3 UX390 UX390U UX390UA

5000mAh/6Cell 11.1V New Battery Acer AL14A32 For Acer ASPIRE E5-521 ASPIRE E5-521G ASPIRE E5-531

Monday, 28 August 2017

OnePlus 5: Everything you need to know about the mid-range flagship


The original flagship killer is back with, well, another flagship killer. After weeks of leaks and rumors, OnePlus has released its sixth handset, the OnePlus 5, and it has the major Android players in its sights: the LG G6, Galaxy S8, and HTC U11.

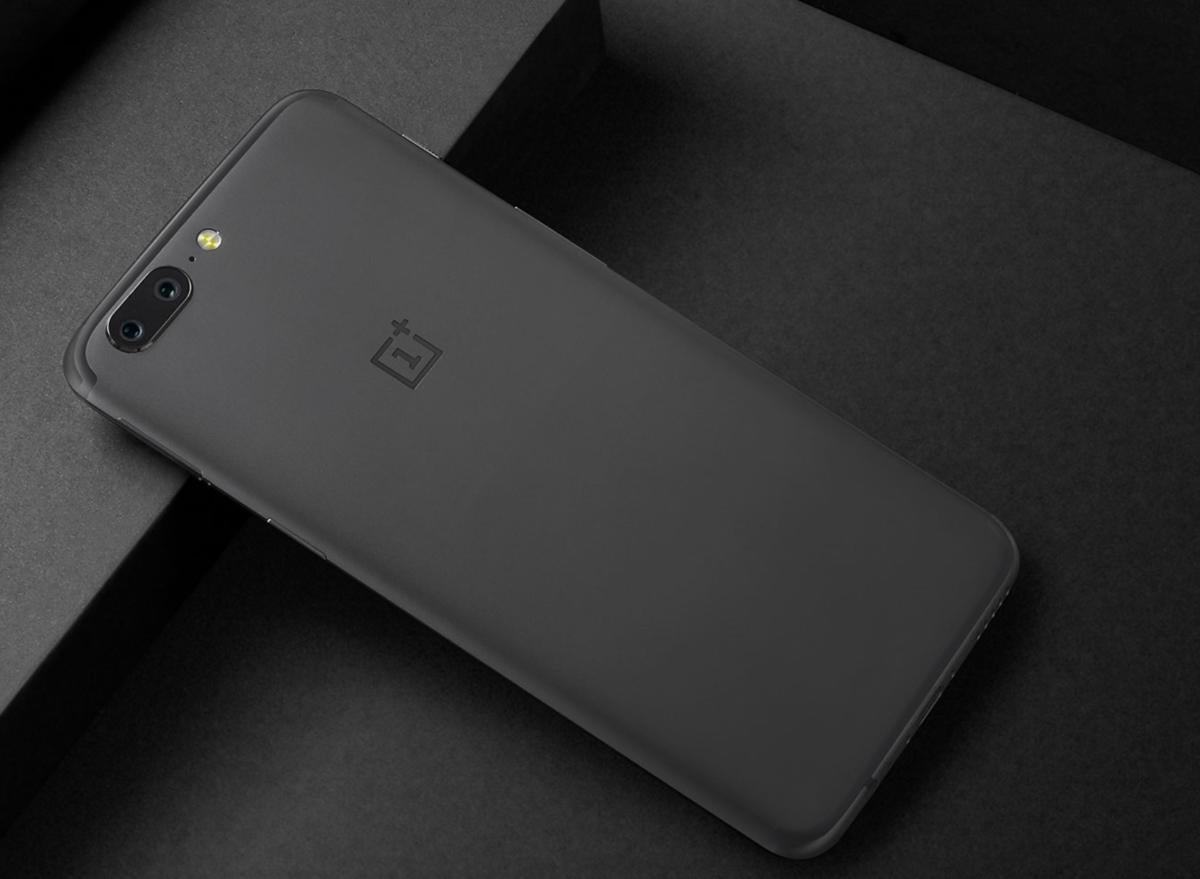
oneplus 5 back

And it looks to be a formidable competitor. Packing the fastest processor around in the Snapdragon 835, up to 8GB of RAM, a 3,300mAh battery, and dual cameras, the OnePlus 5 fills out the spec sheet for less. Here’s everything you need to know, including our full review of the OnePlus 5.

OnePlus 5 specs

l Display: 5.5-inch 1080p Full HD AMOLED, 401ppi

l Dimensions: 152.7 x 74.7 x 7.25 mm

l Weight:
153g

l Color: Midnight black, slate gray

l Operating system: OxygenOS based on Android 7.1.1 Nougat

l CPU:
Qualcomm Snapdragon 835 (octo-core, 10nm, up to 2.45GHz)

l GPU: Adreno 540

l Rear camera: 16MP, f/1.7 + 20MP f/2.6

l Front camera: 16MP, f/2.0

l RAM: 6GB/8GB LPDDR4X

l Storage: 64GB/128GB UFS 2.1 2-LANE

l Ports: USB C, dual nano-SIM slot, 3.5mm audio jack

l Battery:
3,300mAh

OnePlus 5 price and release date


The OnePlus 5 was released in June 27, 2017, and is available for purchase through OnePlus’s website. The gray model with 64GB of storage and 6GB of RAM costs $479, and the black model with 128GB of storage and 8GB of RAM will set you back $539. Like OnePlus’s other handsets, the 5 won’t be available through carriers, though OnePlus is calling it a “true world phone,” with support for 34 networks across the globe.

OnePlus 5 review

The OnePlus 5 is a major improvement over the 3 and 3T, but nearly all of the changes are on the inside. That means you’re getting the same display as last year at a higher price. So while it’s still a good deal, it’s not quite the killer bargain it was last year. There’s a lot more to it, so read our review for the full details.

OnePlus 5 display and design


At 7.25mm thick, the OnePlus 5 is the thinnest phone OnePlus has made. It has moved the camera to the upper-left corner like the iPhone rather than keeping it centered, and the antenna lines remain, meaning the back is made of aluminum and not glass.

Around the front, OnePlus has resisted the bezel-trimming trend. It looks almost exactly like the 3T, with the same 5.5-inch Full HD 1920x1080 resolution display and pill-shaped home button/fingerprint sensor. Thankfully, it also still has the 3.5mm headphone jack on the bottom edge of the device and an alert slider on the left side. It is available in three color options, depending on options. Both models are available in a slate gray color, but to get it in soft gold you’ll need to choose the 64GB model, while the 128GB version is available in an exclusive midnight black color.

OnePlus 5 performance and battery

OnePlus has always packed its flagship handset with the latest silicone, and the Snapdragon 835 inside the OnePlus 5 is a screamer. Elsewhere, the phone brings 6GB or 8GB of RAM, 64GB or 128GB of UFS 2.1 storage, Bluetooth 5, and a 3,300mAh battery.

While the battery is smaller than the one in last year’s 3T, it’s more than big enough to get through a full day of use. Plus, the 5 uses OnePlus’ proprietary Dash Charge system to power up quicker than its competitors. However, since the OnePlus 5 has an aluminum back, it doesn’t support wireless charging like the S8 and G6.

OnePlus 5 camera

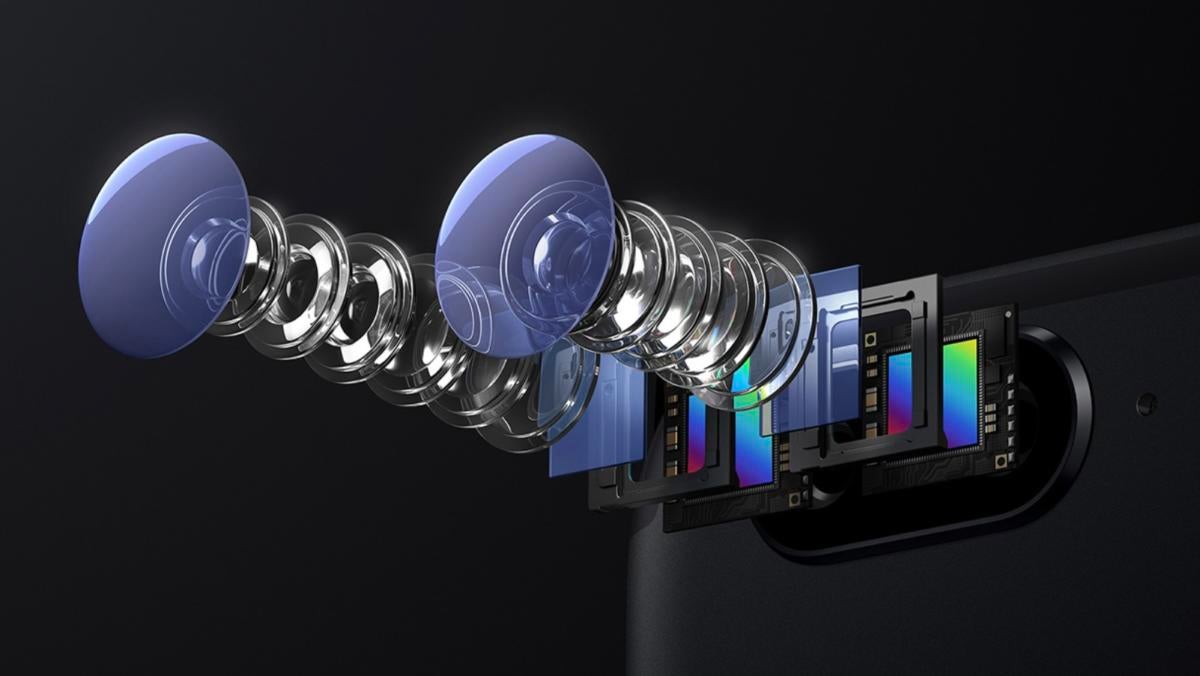
OnePlus has hyped the heck out of the camera in the OnePlus 5. It ditches the older version’s single shooter in favor of a dual-camera system, pairing a custom Sony IMX398 16MP sensor with a large f/1.7 aperture with a 20MP telephoto one. Around the front you get a 16MP lens with f/2.0 aperture.

oneplus 5 camera

The system brings Fast AF and Smart Capture that will let you take shots instantaneously while filtering out noise and inconsistencies in low-light situations, as well as improved HDR and a portrait mode that simulates a depth of field. It also features 1.6x optical zoom (up to 8x when combined with the digital zoom) and a pro mode that includes a tiny histogram so you can fine-tune the pixels. Notably neither lens features optical image stabilization.

OnePlus 5 OS

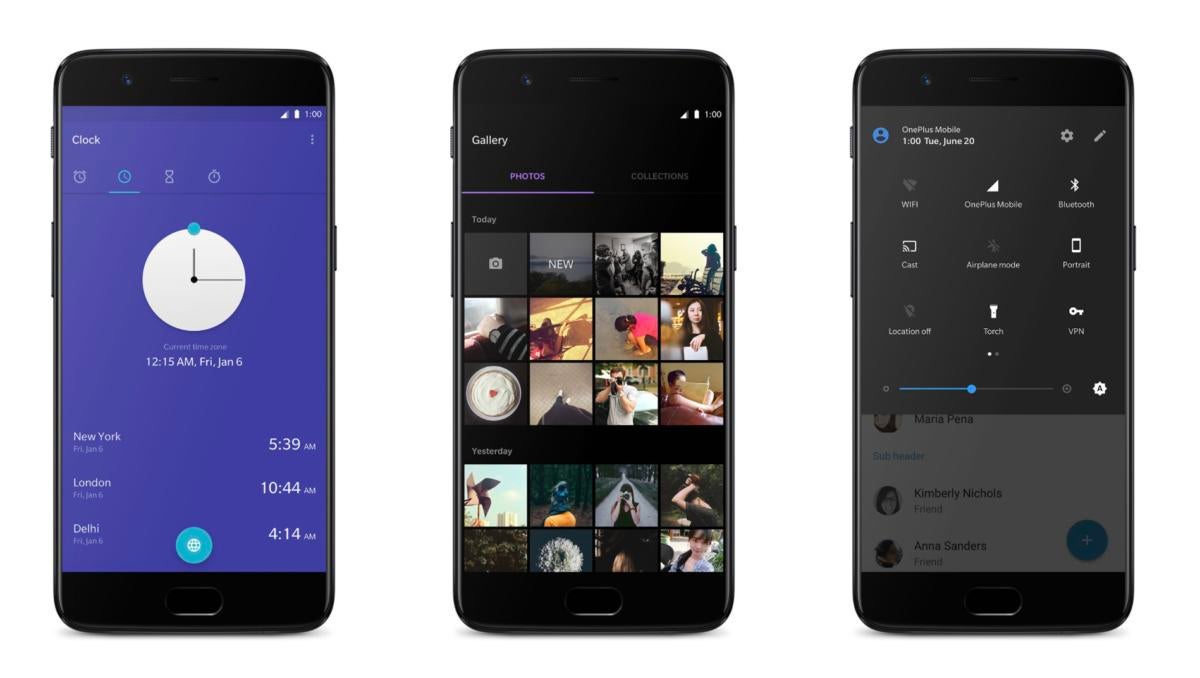
The OnePlus 5 runs OxygenOS based on Android 7.1.1 Nougat. Previous iterations haven’t strayed too far from stock Android, and the OnePlus 5’s version is no different. But there are some new features.

oneplus 5 os

As you use it, it will learn your habits and prioritize your apps accordingly on a new quick-launch area of the Shelf. A Do Not Disturb mode just for gaming will block notifications and disable the soft buttons for an uninterrupted experience. Secure Box lets you lock up documents, photos, and videos behind a fingerprint- or pin-protected folder. And a new Reading Mode will optimize the display in apps like Amazon’s Kindle reader to make words easier on your eyes.

FAQ

What happened to the OnePlus 4?

There’s a reason OnePlus has jumped from the 3T to the 5. In Chinese culture, the number four is considered unlucky, like the number 13 in the U.S. This is due to the Chinese phonetic pronunciation of the number four being like the word for death and suffering. Many elevators in China skip the fourth floor, much like U.S. hotels often jump from floor 12 to 14.

What’s in the box?


You get a Dash charger and a cable, along with a SIM ejector tool. That’s it. OnePlus still doesn’t include a free set of earbuds, though you can buy a pair from the OnePlus site for $20.

Are there any cases available?

Yes! Just like its previous phones, OnePlus is selling a series of case available in faux wood, carbon fiber, and sandstone. Additionally, there’s a flip cover and an official Otterbox case in black or red.

Can I bring an SD card?

Sadly, no. While there are two nano SIM slots in the SIM tray, the OnePlus 5 doesn’t support SD cards for storage. So you might want to splurge on the bigger model if space is a concern.

How does Dash Charge work?

OnePlus supplies a proprietary cable and a plug that is needed for Dash Charging. But since the OnePlus 5 doesn’t support the Quick Charge standard on the S8 and LG G6, if you don’t use the supplied cable and plug, the phone will charge as normal.

I’m a Verizon customer. Will it work for me?

Nope. While the OnePlus 5 supports more bands than ever, Verizon’s isn’t one of them. And neither is Sprint’s. So unless you want to switch to AT&T or T-Mobile, you’re out of luck.

Microsoft pushes Windows mixed reality with two tiers of PCs and a Halo game tease


Microsoft’s bid to bring Windows mixed reality to the masses is taking shape with a raft of affordable PCs. On Monday the company announced that its hardware partners will launch two types of mixed-reality PCs this holiday season, showing them off first at the IFA show this week in Berlin. The company also said its mixed-reality content would include Steam’s VR games and even some sort of Halo experience.

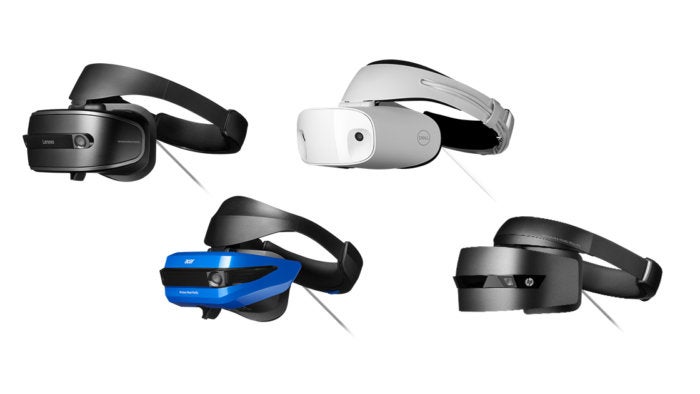
Microsoft has spent much of this year building up its mixed-reality ecosystem. The company has promised that mixed reality will be a key part of the Windows 10 Fall Creators Update. Working in concert, its hardware partners—HP, Lenovo, Dell, and Acer—plan to launch mixed-reality devices in time for the holidays.
Microsoft mixed reality headsets

Pricing is important: Acer’s headset, for instance, will be available for $299 without the controllers, undercutting the HTC Vive and Oculus Rift. At its Build conference in May, Acer announced a $399 bundle of headset plus a set of motion controllers. Dell, announced that its own mixed-reality head-mounted display, the Dell Visor, will ship for $350 for just the headset, $100 for the controllers, and $450 for a bundle of all of them. Dell’s headset boasts a flip-up visor, and the controllers feature a thumb stick and buttons, according to Dell. Though all of Microsoft’s headsets are tethered to a PC via an HDMI cord, they can track movements in space without the need for external sensors.

Meanwhile, prices of mixed-reality-capable PCs begin at $499. Microsoft’s partners have yet to announce further specifics on those PCs, but we do knows they’ll be classified into two tiers. Windows Mixed Reality PCs with integrated graphics will run at up to 60 frames per second, while Windows Mixed Reality Ultra PCs with discrete graphics will provide up to 90 frames per second.

Why this matters: With mixed and virtual reality, vertigo is a real concern. A guaranteed 60fps experience might be tolerable for certain applications, provided you don’t move you head around too quickly. You’ll really want a PC with discrete graphics—an Ultra PC—for the best experience. Providing PCs purpose-built for mixed reality could help build user interest.

Microsoft tips some MR content partners


Microsoft released a sizzle reel of some of the available apps, which include Dreams of Dali, SuperHot VR, and GoPro 360-degree videos, among others. Microsoft said that “Steam content will also run on Windows Mixed Reality headsets,” though didn’t provide further clarification.

Microsoft also published a graphic of some of the developers who will be publishing apps to mixed reality. Note that they include a number of developers who already have published virtual-reality apps, or just apps for Windows.

One of those developers, Microsoft said, will be 343 Industries, the developers of the Halo series of games. There will be a Halo mixed-reality experience, Microsoft promised, without delving into more details.

Alex Kipman, the technical fellow at Microsoft who helped launch the HoloLens two years ago, called Microsoft’s reveal a “sneak peek into what you can expect this holiday,” he wrote in a blog post. “We are just getting started and we are honored to work with world class creators and developers.”

Google Allo finally gains a web interface but it may be too late


Google’s scattershot messaging strategy has one less problem. Starting today, Android users can log in to Allo on the web to see and send messages, but it probably won’t make the chat platform more popular.

For one, there are a lot restrictions. You’ll need an Android phone. It only works through the Chrome browser. You’ll have to get the latest version of Allo (16.0.024) before you can link your account. And the biggest one of all: Your phone will need to be online and running the Allo app for the web interface to connect. In other words, it’ll be quicker in most cases to just use your phone.

Why this matters: Well, we’re not really sure it does. While the idea of an Allo web interface sounds exciting in theory, in reality it’s just another Google messaging platform to ignore. Allo never took off the way Google hoped it would, and an extremely limited web app that requires phone tethering is unlikely to get new people to use it. Until Google offers proper SMS in Allo, the app will continue to wither in the Play Store, with or without a web interface.

Allo again 
google allo

Criticism aside, the Allo web interface is a pleasure to use. To get started, visit Allo for web in your Chome browser, where you’ll be greeted with a QR code. Then, open the app on your phone, tap the side menu button, and select Allo for web. (If you don’t see it you’re probably running an older version.) It’ll switch to a viewfinder so you can scan the QR code on your computer screen, which will link your PC and your phone.

And that’s pretty much it. All of your conversations will be pulled over (assuming you have Google Drive backups turned on), and you’ll be able to quickly continue a conversation or start a new one. Nearly every Allo feature is supported, including group chats, incognito conversations, stickers, and, most importantly, Google Assistant.

The Allo web interface is just as easy to navigate as the mobile one, with a sidebar of your conversations and a collapsible list of your sticker packs. You can summon Assistant into conversations by clicking the button in the conversation bar and attach files, but there’s no way to access the camera, so you won’t be able to make selfie stickers. Additionally, you lose out on one of Allo’s best features, an iMessage-style animation that indicates the other person in your conversation is typing.

If the latest version of Allo hasn’t appeared on your phone yet, you can side-load the Google-signed APK from APKMirror. iPhone users are out of luck at the moment, but Google says iOS/Mac support is coming soon.

Sunday, 27 August 2017

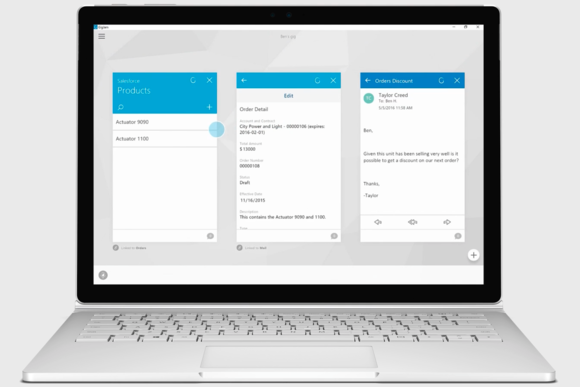
Microsoft's fascinating GigJam service will close in September


Microsoft will close and end the preview of its new GigJam productivity service, which was aimed at helping teams of people collaborate in real time over the Internet, the company said Tuesday.


“After careful consideration, we’ve decided to retire the GigJam Preview on September 22, 2017,” Microsoft said. As of that day, any remaining “gigs” will automatically expire.

GigJam combines data from a variety of services including Microsoft’s own Office 365, Trello, Dropbox, and Salesforce. Users can then bring that information into a shared workspace, or “gig,” allowing them to quickly work together.

Users can easily redact part of the information they’re sharing with other people, meaning they can selectively share only what needs to be seen in order to get a job done.

There’s no way around it: GigJam was a kind of wacky product Microsoft has built to help people get work done together. But what’s interesting is that it’s emblematic of the company’s current approach to the productivity market—focused on letting people quickly and independently collaborate across different services while maintaining a secure environment.

Here’s how it works: One user starts a “Gig,” and then pulls in information from whatever services they need, like email, Salesforce, Office documents, and Asana tasks. That information shows up as a card inside GigJam, where users can highlight some information inside a card, redact other information, and then send the whole bundle off to another user for review or editing.

It’s a good way to both keep focused on the task at hand (like editing only one slide out of a PowerPoint presentation) and also enables workers to more easily team up with people outside of their organization, like suppliers and contractors who shouldn’t be privy to some information.

The GigJam interface also combines a bunch of interesting input methods. Users can work entirely with the keyboard and mouse, but they can also interact with Gigs using touch and voice input. The service is a crazy bundle of different modern capabilities and looks in demos like something out of the future.

GigJam’s radical differences from other collaboration products like Slack, email, Yammer, and SharePoint are what make it unique and powerful, but may also end up being its undoing. Plenty of companies have bet on innovative productivity services that ended up being less popular than expected. The epic failure of Google Wave comes to mind.

GigJam is available on Windows and Mac, with a beta of the iOS application coming soon. Users can sign up for the private beta here, and Microsoft says everyone who requests an invitation will get one. People who have already requested an invitation to the beta before now should have one waiting in their inboxes.

Popular Articles